用 API 克隆网站 —— 为 Agent 而生
面向开发者的 Clonesite Clone API 指南,可走 REST 或托管 MCP。创建 API Key 或使用 OAuth agent login;只有需要 callback 时才添加 webhook 签名 secret。之后让 Agent preflight、创建 clone request、轮询状态,并下载可编辑的 React 和 Tailwind 源码。
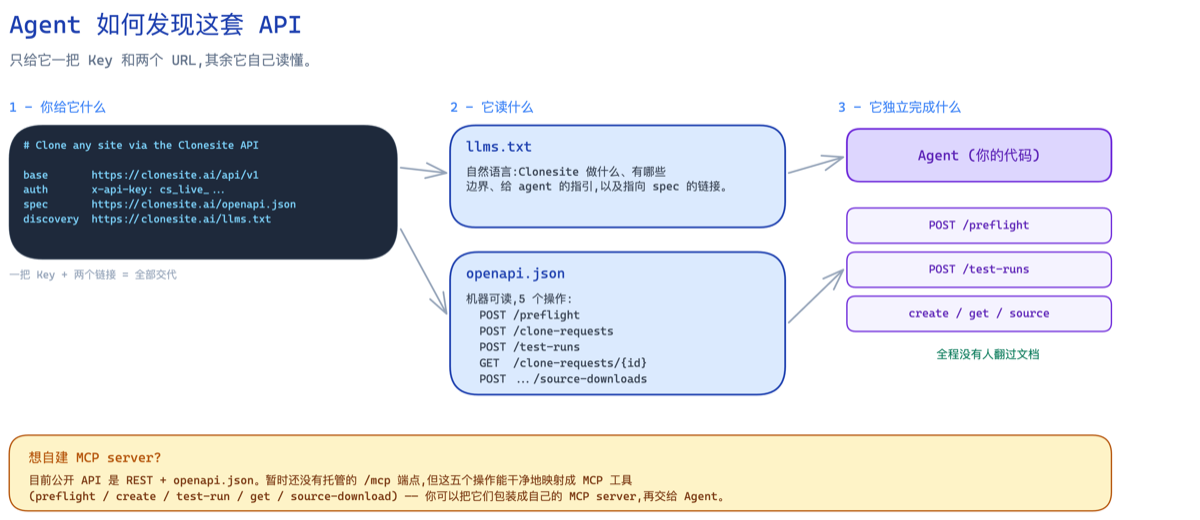
大多数 API 都默认由人来读文档、接好调用、然后盯着这套集成跑。这套不一样。
用 Clonesite 的克隆 API,人只负责信任设置——创建一把 Key,或批准 OAuth agent login;只有要接 callback 时,才 reveal 一个 webhook 签名 secret——其余全部交给 Agent:先做 preflight,再跑免费 mock 测试,然后把一个 live URL 变成可编辑的 React 和 Tailwind 源码、等待构建、再下载代码。你授权凭证, 剩下的它来做。
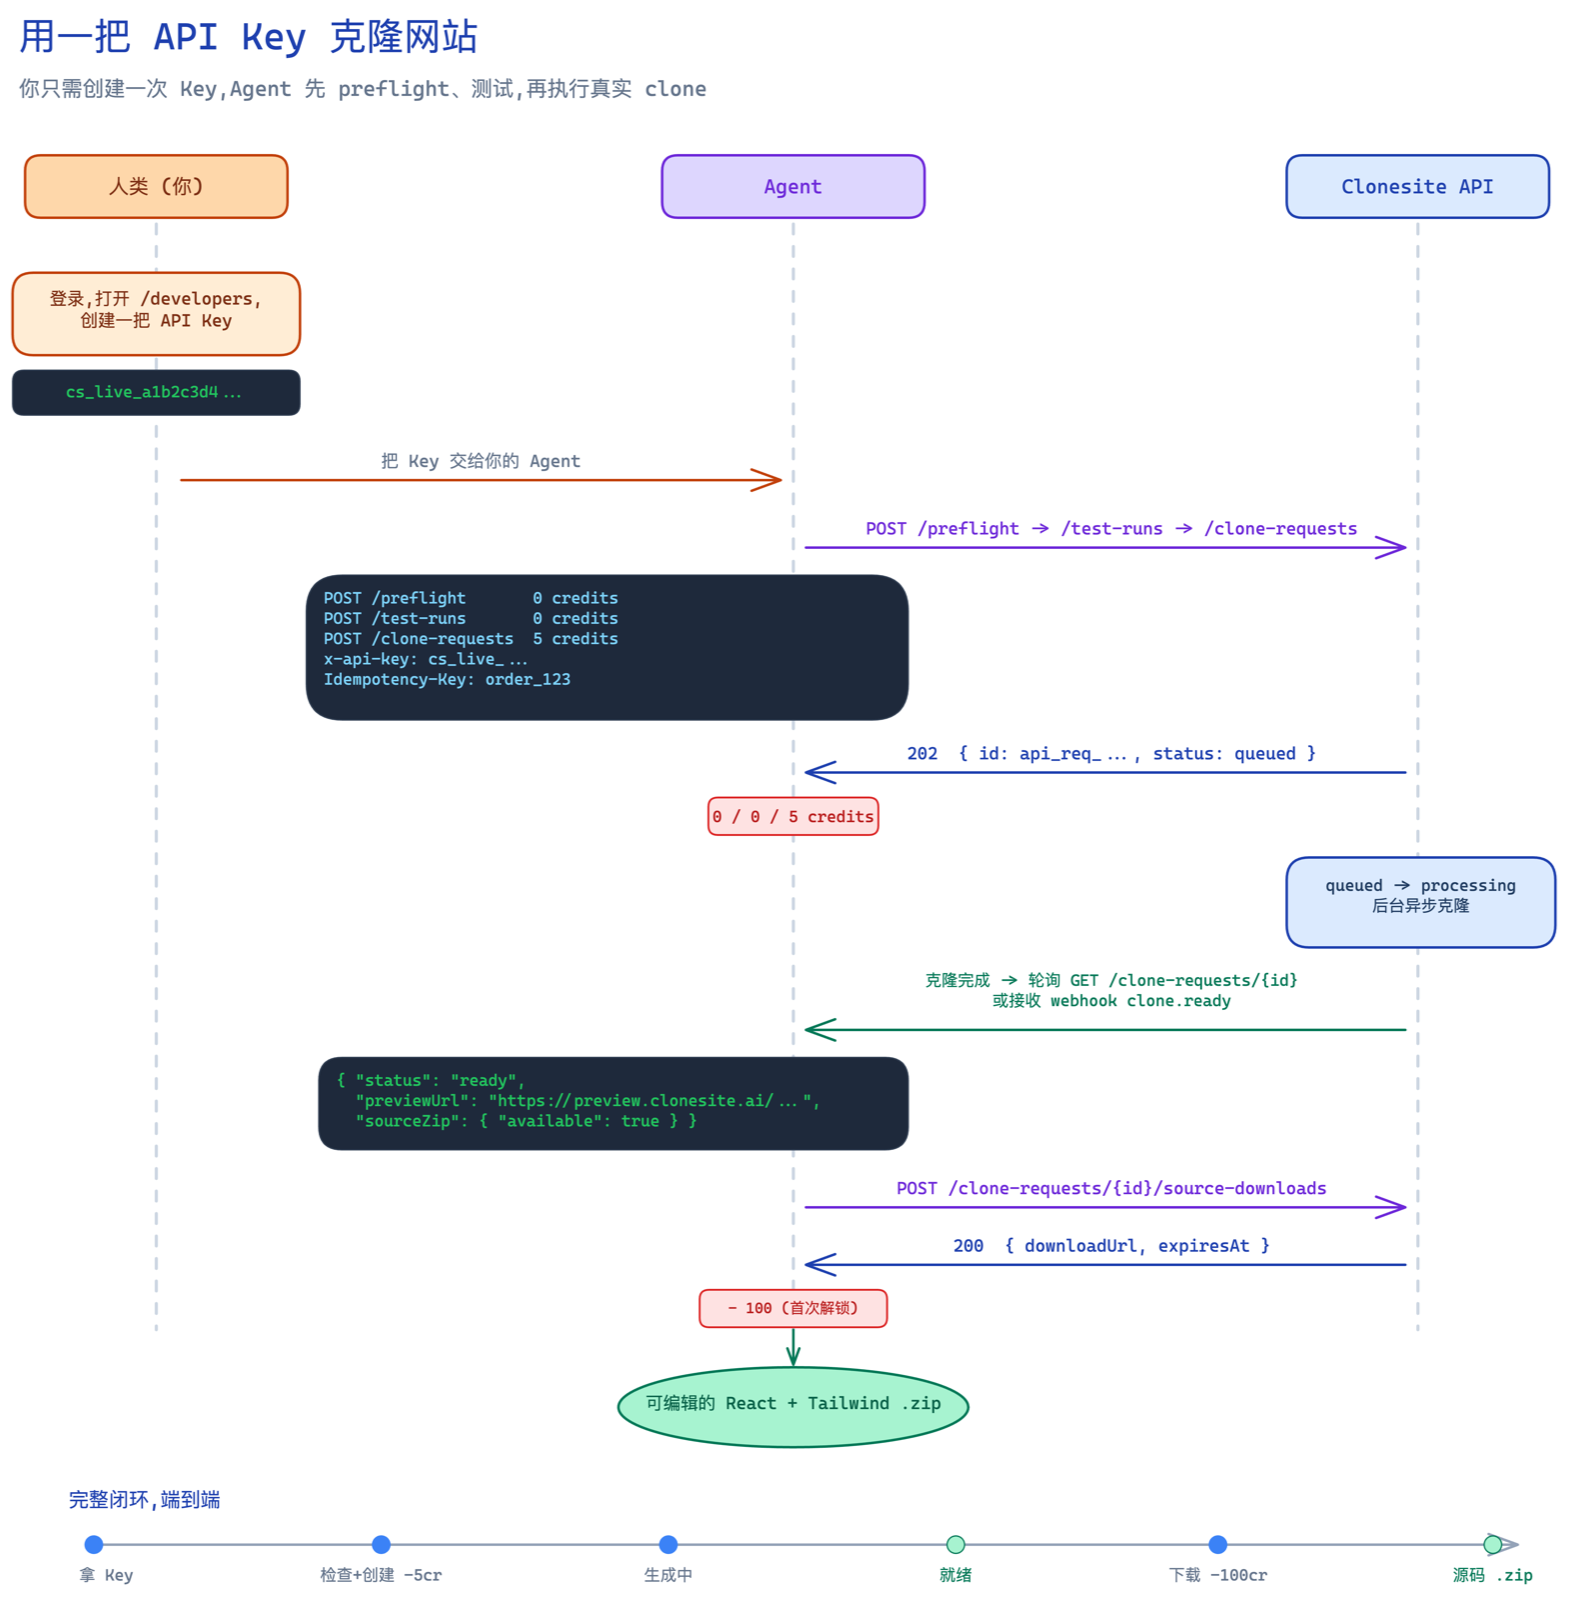
一个人工步骤,之后是 Agent 自己掌控的循环:检查、创建、等待、下载。
心智模型
整套集成包含一条凭证设置路径和五个克隆操作:
- 人类(一次): 在
/developers创建一把 API Key,或批准 OAuth agent login。如果要使用 callback, 再 reveal 并保存账号级 webhook signing secret。 - Agent(花钱前):
POST /clone-requests/preflight,并在接入阶段跑POST /clone-requests/test-runs。 - Agent(真实克隆):
POST一个 clone request,轮询状态(或接收 webhook),再POST解锁并下载源码。
就这些。不需要 SDK,不需要浏览器 session,Key 创建之后也不需要再点任何 dashboard。REST base URL 是:
https://clonesite.ai/api/v1
支持 MCP 的客户端也可以使用托管的 Streamable HTTP endpoint:
https://clonesite.ai/mcp
第 1 步 —— 创建 Key(只有 callback 才需要 webhook secret)
登录,打开 /developers,点击 Create your first key。
你会看到一个形如 cs_live_a1b2c3d4... 的值,且只显示这一次。它以 hash 形式存储,所以请立刻复制
并交给你的 Agent(或写进环境变量)。
把 Key 当成密码:任何持有它的人都能花掉你的 credits。developers 页面还会直接给你一段可粘贴的 Agent 交接说明:
# Clone any site via the Clonesite API
base       https://clonesite.ai/api/v1
mcp        https://clonesite.ai/mcp
auth       Authorization: Bearer cs_live_...
spec       https://clonesite.ai/openapi.json
discovery  https://clonesite.ai/llms.txt
server     https://clonesite.ai/mcp/server-card
走 API Key 时,永远是人类账户拥有者先创建 Key,之后 Agent 才能使用。支持 OAuth 的 Agent 可以通过 Clonesite 元数据发现授权服务器,并取得带 Clone API scope 的 access token。无论哪种方式,都不要把 session cookie、magic-link URL、原始支付凭证或只应留在 dashboard 里的 secret 交给 Agent。
只用 API Key 就能创建 request 并轮询状态。如果你的集成会传 callbackUrl,才需要在 /developers 的
webhook 面板里 rotate signing secret,并把 reveal 出的 whsec_... 值保存到你的服务端。Secret 属于账号;
callback URL 仍然按每个 request 传入,所以不同任务可以投递到不同 endpoint,而你的验签逻辑使用同一个账号级
secret。
第 2 步 —— 每次调用都带认证
每个请求都在 Authorization header 里携带 bearer 凭证。本文示例使用人类创建的 API Key;支持 OAuth
的客户端可以使用从 Clonesite auth metadata 发现并取得的 scoped access token:
curl https://clonesite.ai/api/v1/clone-requests/api_req_example \
  -H "Authorization: Bearer cs_live_a1b2c3d4..."
每个凭证都有明确权限:clone_requests:create、clone_requests:read 和
source_downloads:create。preflight 和 test-runs 使用 create 权限,状态轮询使用 read 权限,源码 ZIP
下载使用 source-download 权限。
第 3 步 —— Preflight 和免费测试
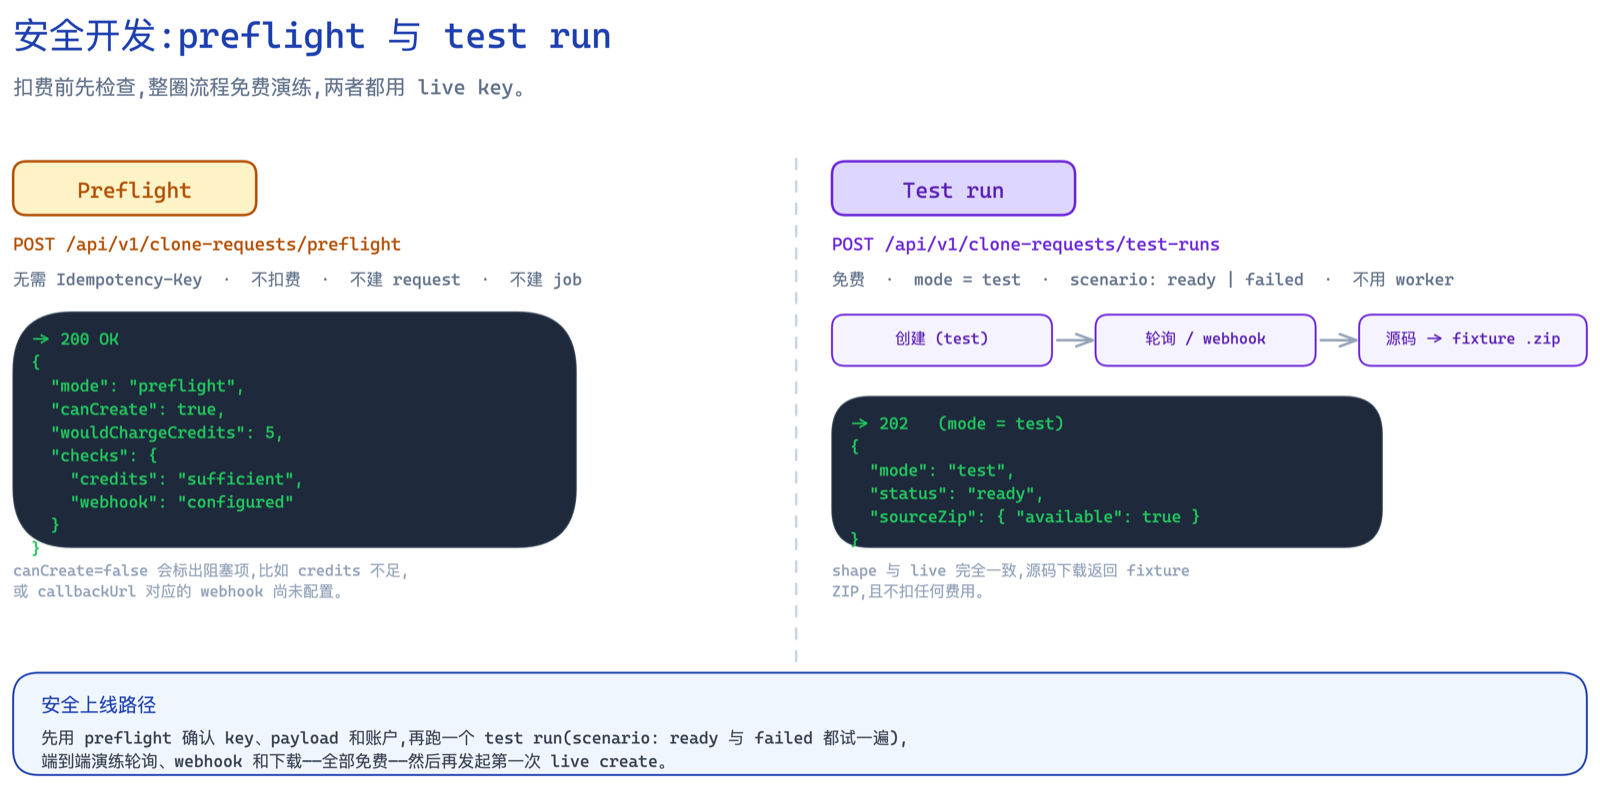
扣费前先用 preflight 检查。test run 免费演练轮询、webhook 和下载。
花 credits 前,先用 preflight 验证同一份 payload。它会检查 Key、权限、payload、credits;只有 payload
里有 callbackUrl 时,才会检查 webhook 配置。没有 callbackUrl 时,同一把 API Key 可以直接创建并轮询
request,不需要 webhook secret。Preflight 不会写入 request、创建 job、扣 credits 或发送 webhook。
curl -X POST https://clonesite.ai/api/v1/clone-requests/preflight \
  -H "Authorization: Bearer cs_live_a1b2c3d4..." \
  -H "Content-Type: application/json" \
  -d '{
    "sourceUrl": "https://stripe.com",
    "prompt": "Clone this site as an editable React and Tailwind app.",
    "externalRequestId": "order_123",
    "callbackUrl": "https://your-app.com/webhooks/clonesite"
  }'
preflight 通过时是这样——没有创建任何东西,也没有动用 credits:
{
  "ok": true,
  "mode": "preflight",
  "canCreate": true,
  "wouldChargeCredits": 5,
  "wouldCreateCloneRequest": false,
  "wouldCreateJob": false,
  "checks": {
    "apiKey": "valid",
    "permission": "clone_requests:create",
    "payload": "valid",
    "credits": "sufficient",
    "webhook": "configured"
  }
}
接入阶段再用同一把 live key 和同一个 webhook handler 跑 test-runs。它会创建一条免费的
mode: "test" request 并发送签名 clone.ready 或 clone.failed webhook。它的响应就是真实调用
返回的同一个 request 对象——不是下载 URL——所以你可以用完全相同的端点演练轮询、webhook,甚至一次
免费的 fixture 源码下载,全程不为真实 clone 付费。
curl -X POST https://clonesite.ai/api/v1/clone-requests/test-runs \
  -H "Authorization: Bearer cs_live_a1b2c3d4..." \
  -H "Idempotency-Key: test_order_123" \
  -H "Content-Type: application/json" \
  -d '{
    "sourceUrl": "https://stripe.com",
    "prompt": "Test my Clone API integration.",
    "externalRequestId": "test_order_123",
    "callbackUrl": "https://your-app.com/webhooks/clonesite",
    "scenario": "ready"
  }'
test run 返回 mode: "test"。像真实 request 一样轮询或等 webhook——它会走到 ready(或按 scenario 走到 failed),全程不扣 credits:
{
  "id": "api_req_def456",
  "mode": "test",
  "status": "queued",
  "sourceZip": { "available": false, "unlocked": false, "creditCost": 0 },
  "statusUrl": "/api/v1/clone-requests/api_req_def456"
}
第 4 步 —— 创建真实 clone request
发送你想克隆的公开 URL 和一段描述输出的 prompt。真实 create 和 test-runs 都要求
Idempotency-Key header——正是它让重试变得安全。
curl -X POST https://clonesite.ai/api/v1/clone-requests \
  -H "Authorization: Bearer cs_live_a1b2c3d4..." \
  -H "Idempotency-Key: order_123" \
  -H "Content-Type: application/json" \
  -d '{
    "sourceUrl": "https://stripe.com",
    "prompt": "Clone this site as an editable React and Tailwind app.",
    "externalRequestId": "order_123",
    "callbackUrl": "https://your-app.com/webhooks/clonesite"
  }'
externalRequestId 和 callbackUrl 是可选的。你会拿到 202 Accepted 和一个稳定的 api_req_* id:
{
  "id": "api_req_abc123",
  "mode": "live",
  "status": "queued",
  "sourceUrl": "https://stripe.com/",
  "credits": { "charged": true, "creditCost": 5, "refunded": false },
  "sourceZip": { "available": false, "unlocked": false, "creditCost": 100 },
  "statusUrl": "/api/v1/clone-requests/api_req_abc123"
}
创建一个真实 request 扣 5 credits,立即扣费。预览免费;下载源码是后续单独的动作(第 6 步)。
正确使用幂等
Idempotency-Key 是你在网络不稳时的安全网:
- 相同 Key + 相同 body → 你拿回同一个 request。想重试多少次都行,既不会重复扣费,也不会 产生重复的 job。
- 相同 Key + 不同 body →
409 idempotency_conflict。Key 会绑定到它第一次见到的 payload (包括callbackUrl)。
用一个稳定且有意义的值,比如 order:${orderId},或一个你持久化保存的 UUID。
第 5 步 —— 等待 ready(轮询或 webhook)
克隆是异步执行的,通常需要 1–3 小时。有两种方式知道它什么时候完成。
轮询状态端点:
curl https://clonesite.ai/api/v1/clone-requests/api_req_abc123 \
  -H "Authorization: Bearer cs_live_a1b2c3d4..."
status 会走过一个很小、可预测的生命周期,计费也内建其中:
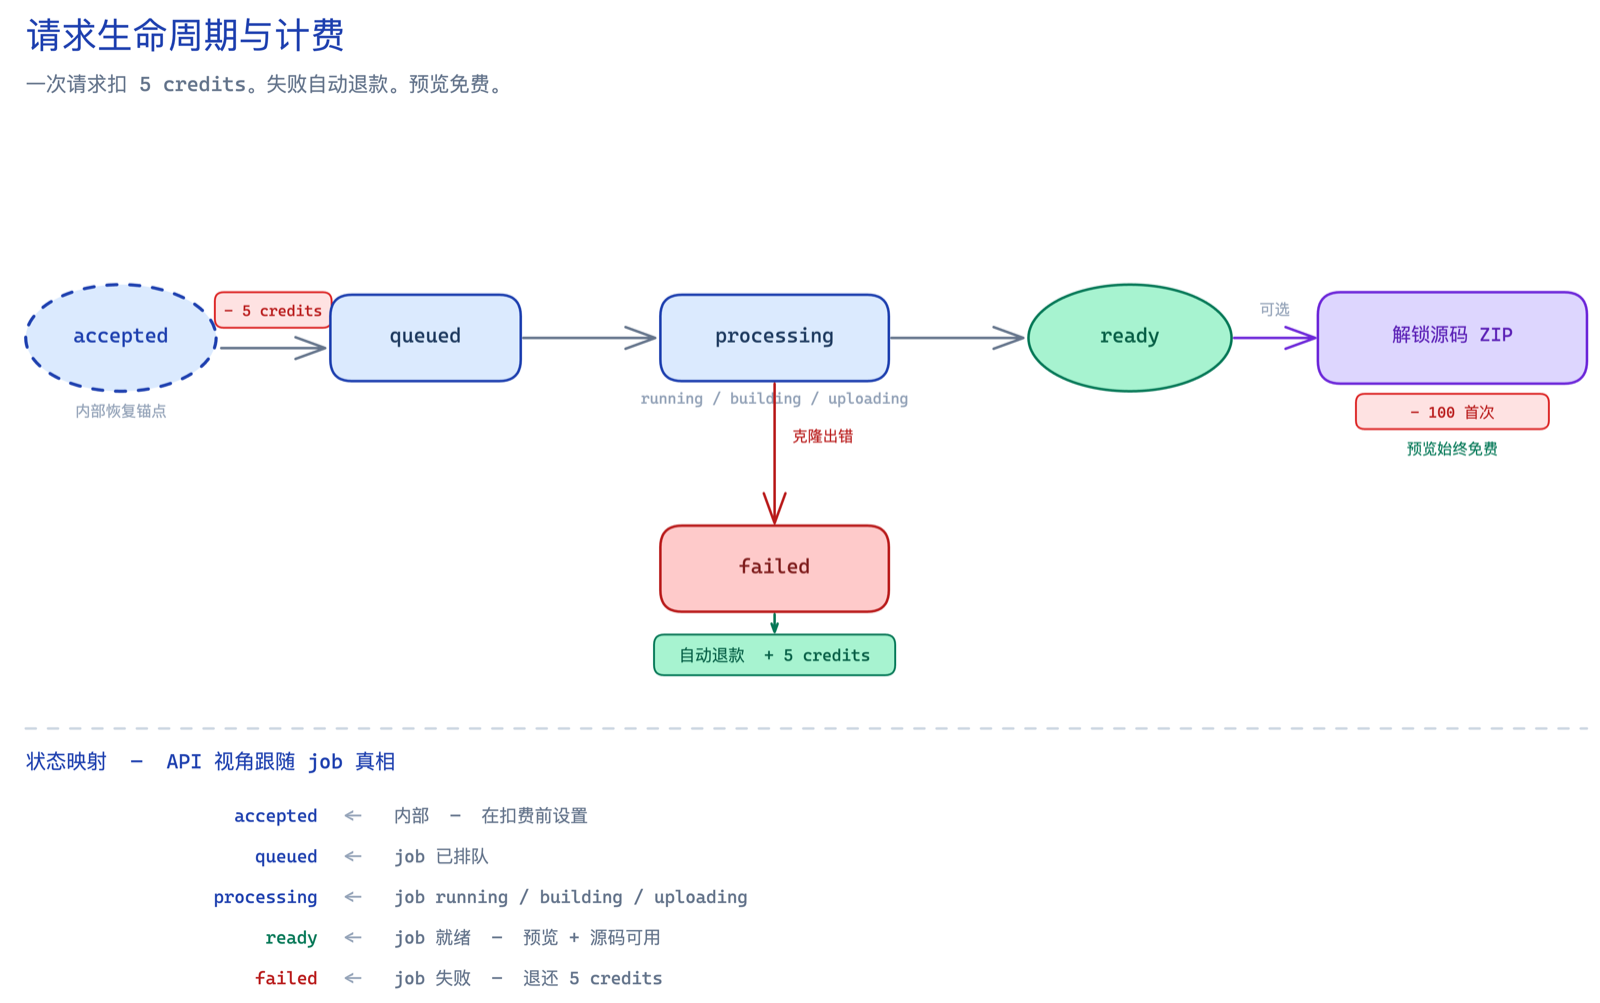
创建扣 5 credits。克隆失败自动退款。预览始终免费。
ready 响应会暴露预览以及源码是否可用——但绝不会返回下载 URL:
{
  "id": "api_req_abc123",
  "mode": "live",
  "status": "ready",
  "previewUrl": "https://preview.clonesite.ai/...",
  "sourceZip": { "available": true, "unlocked": false, "creditCost": 100 }
}
如果克隆失败,状态会变成 failed,那 5 credits 会自动退还——构建没落地,你就不用付钱。
或者接收 webhook。 无论是否使用 webhook,都可以继续 polling。如果你传了 callbackUrl,request 一进入
终态,Clonesite 就会 POST 一个带签名的事件:
event: clone.ready | clone.failed
{
  "event": "clone.ready",
  "id": "evt_abc123",
  "mode": "live",
  "cloneRequestId": "api_req_abc123",
  "artifactSlug": "stripe-a1b2c3",
  "previewUrl": "https://preview.clonesite.ai/...",
  "sourceZip": { "available": true, "unlocked": false, "creditCost": 100 }
}
信任 body 之前先验签。使用 /developers reveal 出来的 whsec_... secret。每次投递都使用 Standard
Webhooks headers,并对 webhook-id + "." + webhook-timestamp + "." + rawBody 计算 HMAC:
webhook-id: evt_abc123
webhook-timestamp: 1781946000
webhook-signature: v1,<base64 hmac_sha256>
import crypto from "node:crypto";

function verifyClonesiteWebhook(rawBody, headers, secret) {
  const id = headers["webhook-id"];
  const ts = headers["webhook-timestamp"];
  const signature = headers["webhook-signature"]; // "v1,<base64>"
  const expected = crypto
    .createHmac("sha256", secret)
    .update(`${id}.${ts}.${rawBody}`)
    .digest("base64");
  const provided = signature?.startsWith("v1,") ? signature.slice(3) : "";
  return (
    provided.length === expected.length &&
    crypto.timingSafeEqual(Buffer.from(provided), Buffer.from(expected))
  );
}
webhook 是通知,不是事实源。投递会按退避策略重试,而且 body 永远不携带下载 URL——所以即使 webhook 日志泄漏,也无法被用来拉取你的源码。收到后,再调一次状态端点来确认最终状态。
第 6 步 —— 下载源码(可选)
源码 ZIP 是一个有意为之的第二步,在人(或你的 Agent)对预览满意之后再做。首次解锁扣 100 credits:
curl -X POST https://clonesite.ai/api/v1/clone-requests/api_req_abc123/source-downloads \
  -H "Authorization: Bearer cs_live_a1b2c3d4..."
{
  "downloadUrl": "https://r2.clonesite.ai/signed-url",
  "expiresAt": 1781949600000,
  "filename": "stripe-a1b2c3-source.zip",
  "creditCost": 100,
  "alreadyUnlocked": false,
  "artifact": {
    "artifactId": "src_art_abc123",
    "artifactSlug": "stripe-a1b2c3",
    "filename": "stripe-a1b2c3-source.zip",
    "contentType": "application/zip",
    "status": "ready",
    "checksumSha256": "9f86d081884c7d65...",
    "sizeBytes": 5242880,
    "createdAt": 1781949000000,
    "updatedAt": 1781949600000
  }
}
这个 URL 是短期有效的(约 5 分钟)——请在 expiresAt 之前把 ZIP 下载或转存到你自己的 storage。再次调用这个
端点只会重新签发一个新 URL,request 一旦解锁就不会再扣 100 credits。
值得处理的错误
API 返回稳定的 JSON 错误结构,这样你的 Agent 可以基于 error.code 分支,而不必解析自然语言:
{ "error": { "code": "insufficient_credits", "message": "..." } }
400——invalid_request、missing_idempotency_key或invalid_json:body 有误、缺少Idempotency-Keyheader,或 JSON 无法解析。401——missing_api_key或invalid_api_key:没传 Key,或 Key 错误、已吊销。402——insufficient_credits:credits 不足以创建或解锁。403——insufficient_permissions或api_key_account_not_found:Key 缺少所需权限,或其账户不可用。404——not_found:未知 request——访问别的账户的 request 也返回这个。409——idempotency_conflict、request_not_ready或source_artifact_not_ready:复用 Key 但换了 body,或在克隆(或其 artifact)ready 之前请求源码。422——invalid_callback_url或webhook_not_configured:callbackUrl 格式有误,或账号还没有 active webhook signing secret 就传了 callbackUrl。429——rate_limited或usage_exceeded:放慢速度,并遵守Retry-Afterheader。500——internal_error:服务器意外错误;用相同的Idempotency-Key重试。
这就是 API 会返回的全部错误码——openapi.json 携带同一份枚举,所以 Agent 无需阅读本页也能逐一映射。
吊销一把 Key 后它会立刻开始返回 401,所以轮换凭证是即时生效的。
为 Agent 而生:自我发现
下面这点才让它成为一套 Agent API,而不只是一套 REST API:Agent 不需要人来读这些文档。把 bearer 凭证和发现链接交给它,其余它自己就能发现。
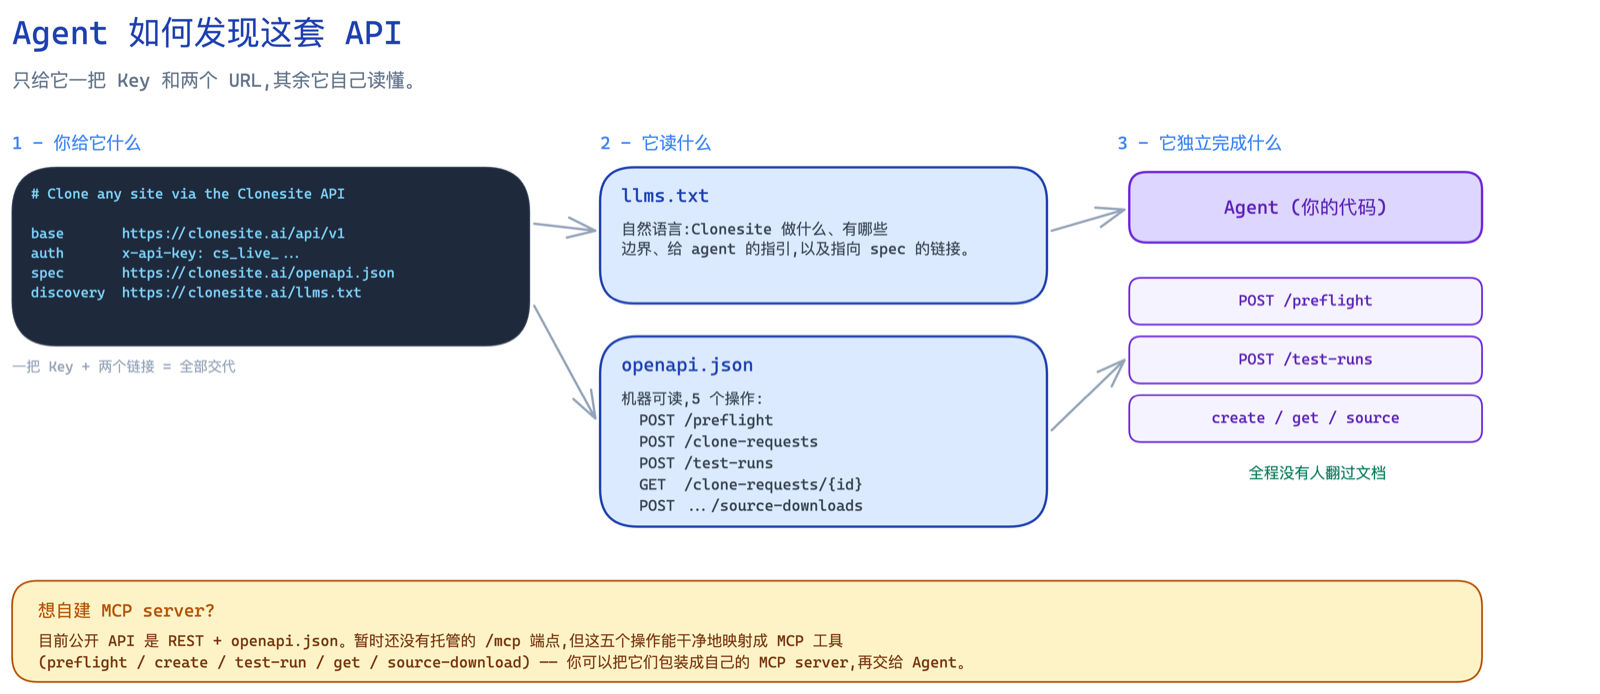
给它一个凭证和发现链接;它自己选择 REST 或 MCP 并构造调用。
- llms.txt 用自然语言描述 Clonesite 做什么、有哪些边界、以及 Agent 应当如何使用它。
- openapi.json 是机器可读的契约:preflight、免费 test-runs、
真实 create、状态轮询、源码下载、
Authorization: Bearer认证方案,以及每一个错误码。 - MCP server card 和
MCP catalog 声明托管的 Streamable HTTP MCP
endpoint:
https://clonesite.ai/mcp。
使用 MCP? Clonesite 现在托管
/mcp作为 Streamable HTTP MCP server。它暴露同样五个操作: preflight、test-run、create、get 和 source-download。使用Authorization: Bearer <api-key-or-oauth-access-token>;AgentAuth JWT 用于 capability execution, 不应直接发送到/mcp。
串起来
把真实调用循环放在一处——preflight、创建、轮询、下载——用原生 fetch,零依赖:
const BASE = "https://clonesite.ai/api/v1";
const KEY = process.env.CLONESITE_API_KEY;

async function cloneSite(sourceUrl, prompt, idempotencyKey) {
  // 1. Preflight(无副作用)
  const preflight = await api("/clone-requests/preflight", {
    method: "POST",
    headers: { "Content-Type": "application/json" },
    body: JSON.stringify({ sourceUrl, prompt }),
  });
  if (!preflight.canCreate)
    throw new Error(`preflight blocked: ${JSON.stringify(preflight.checks)}`);

  // 2. 创建真实 request(扣 5 credits)
  let req = await api("/clone-requests", {
    method: "POST",
    headers: { "Idempotency-Key": idempotencyKey, "Content-Type": "application/json" },
    body: JSON.stringify({ sourceUrl, prompt }),
  });

  // 3. 轮询直到终态
  while (req.status !== "ready" && req.status !== "failed") {
    await new Promise((r) => setTimeout(r, 5000));
    req = await api(`/clone-requests/${req.id}`);
  }
  if (req.status === "failed") throw new Error("clone failed (credits refunded)");

  // 4. 下载源码(首次解锁扣 100 credits)
  const dl = await api(`/clone-requests/${req.id}/source-downloads`, { method: "POST" });
  return dl.downloadUrl;
}

async function api(path, init = {}) {
  const res = await fetch(`${BASE}${path}`, {
    ...init,
    headers: { Authorization: `Bearer ${KEY}`, ...(init.headers ?? {}) },
  });
  const body = await res.json();
  if (!res.ok) throw new Error(`${res.status} ${body.error?.code}`);
  return body;
}
这个函数就是完整的 REST 集成。给你的 Agent 一个 bearer 凭证,把它指向这个循环或托管 MCP server card,它就能自己把任何公开网站克隆成可编辑的源码。
去 /developers 创建你的 Key,或使用支持 OAuth 的 agent login。只有集成需要 callback 时再添加 webhook secret;否则 Agent 只用 bearer 凭证就能 polling。
更想用托管 UI?从 URL 克隆网站的分步指南走的是同一条流程,不需要写代码;两条路径消耗同一份 credits,套餐见定价页。
相关阅读
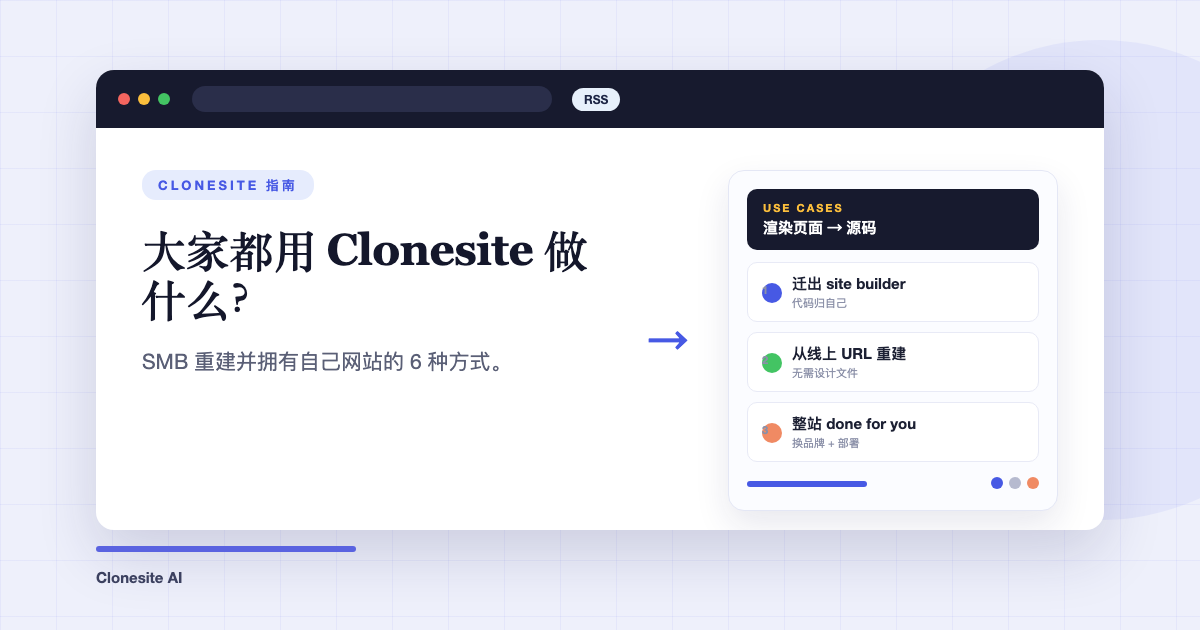 大家都用 Clonesite 做什么?SMB 重建并拥有自己网站的 6 种方式大家用 Clonesite 把任何在线页面变成可编辑的 React 和 Tailwind 源码。最常见的用法是从 Webflow、Framer 等 site builder 迁出、从线上 URL 重建过时的网站、基于验证过的布局快速起站,以及整站 done-for-you 重建。
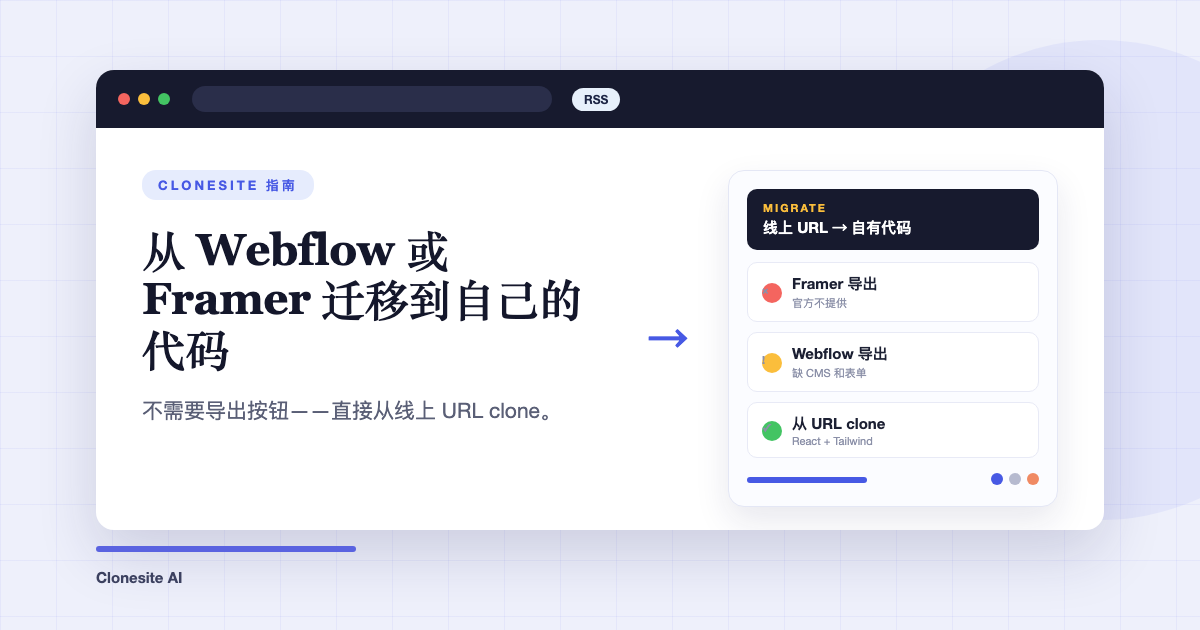 如何从 Webflow 或 Framer 迁移到自己的代码把网站迁出 Webflow 或 Framer 的做法:从每个页面的公开 URL clone 出可编辑的 React 和 Tailwind 源码,部署到静态托管,保持 URL 结构让排名平移。你不需要平台的导出功能——Framer 根本不提供,Webflow 的导出不含 CMS 内容和可用的表单。
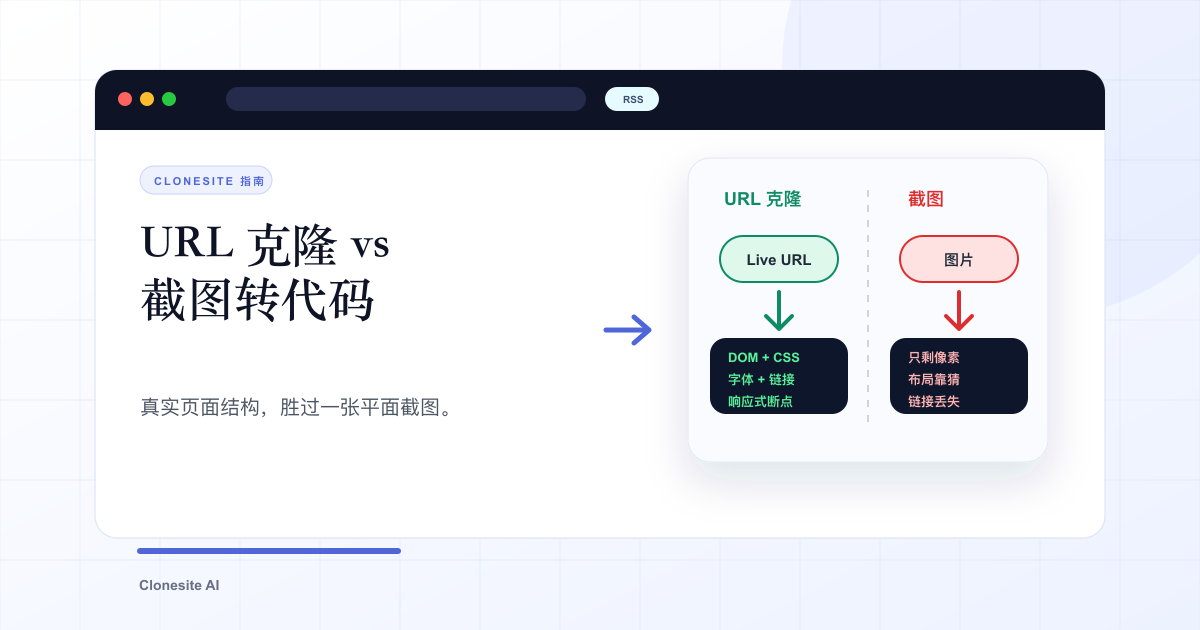 URL 克隆 vs 截图转代码:输出到底差在哪URL 克隆读取一个 live 页面的真实结构——DOM、CSS、字体、链接和响应式断点——把它重建成可编辑代码。截图转代码只看到像素,只能推断布局,丢掉字体、链接和响应式。差别直接体现在输出有多好用。