Clone a Website With an API — Built for Agents
A developer's guide to the Clonesite Clone API over REST or hosted MCP. Create an API key or use OAuth agent login, add a webhook signing secret only if you want callbacks, then let an agent preflight, create clone requests, poll status, and download editable React and Tailwind source.
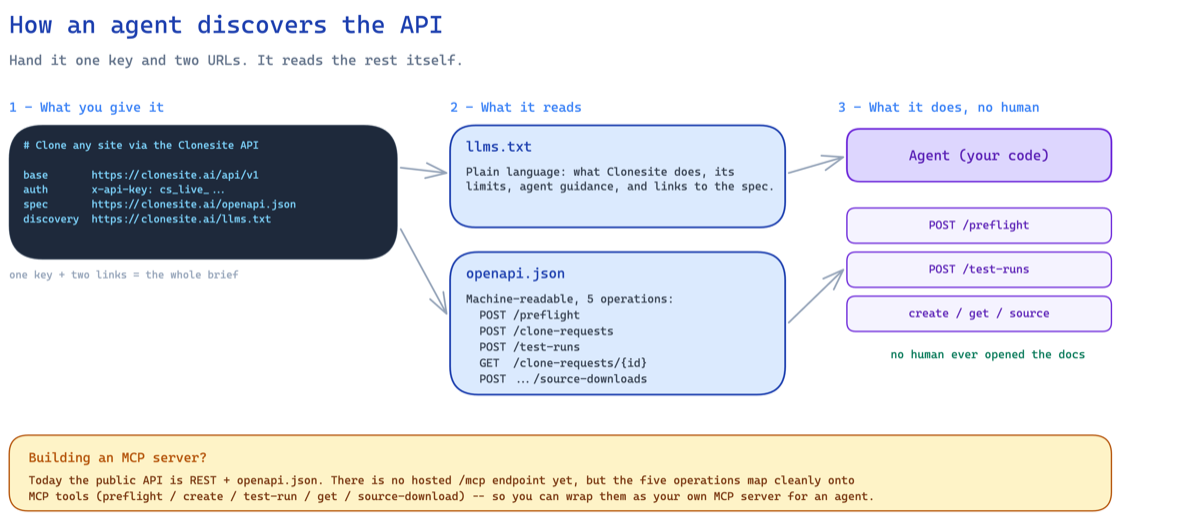
Most APIs assume a human will read the docs, wire up the calls, and babysit the integration. This one doesn't.
With the Clonesite clone API, a person does the trust setup — create a key, or approve OAuth agent login, and reveal a webhook signing secret only if callbacks are part of your integration — and an agent does everything else: it preflights the request, runs a free mock integration test, turns a live URL into editable React and Tailwind source, waits for the build, and downloads the code. You authorize the credential; it does the rest.
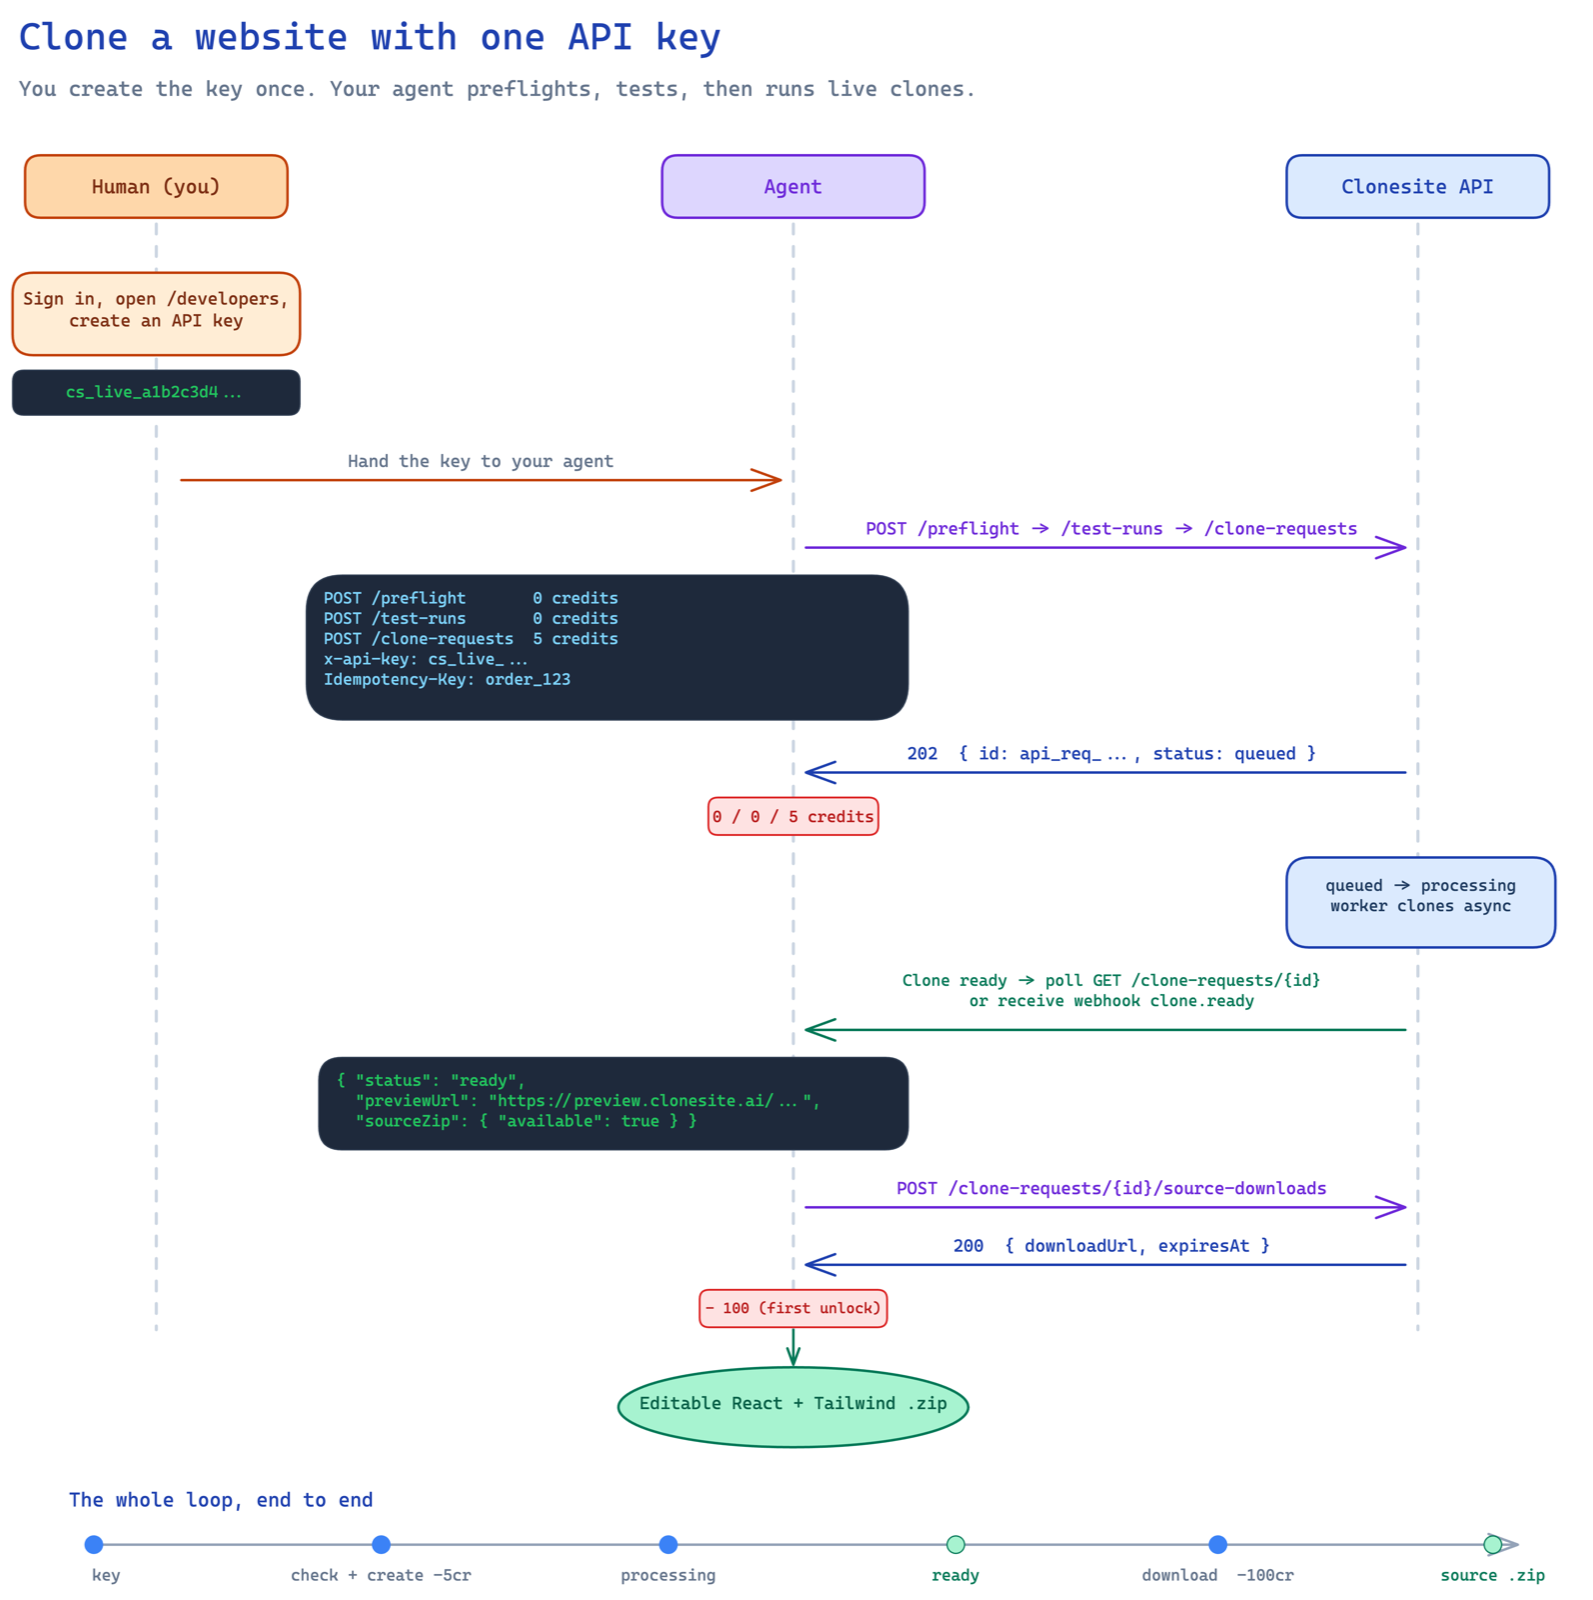
One human step, then a loop the agent owns: check, create, wait, download.
The mental model
The integration has one credential setup path and five clone operations:
- Human (once): create an API key on
/developers, or approve OAuth agent login. If you want callbacks, also reveal and store the account-level webhook signing secret. - Agent (before spending):
POST /clone-requests/preflightand, during setup,POST /clone-requests/test-runs. - Agent (live clone):
POSTa clone request, poll the status (or receive a webhook), thenPOSTto unlock and download the source.
That's it. No SDK is required, no browser session, no dashboard clicking after the key exists. The REST base URL is:
https://clonesite.ai/api/v1
MCP-capable clients can use the hosted Streamable HTTP endpoint instead:
https://clonesite.ai/mcp
Step 1 — Create a key (add webhooks only if you need callbacks)
Sign in, open /developers, and click Create your first
key. You'll see a value like cs_live_a1b2c3d4... exactly once. It's stored hashed, so copy it
immediately and hand it to your agent (or drop it in an environment variable).
Treat the key like a password: anyone holding it can spend your credits. The developers page even gives you a ready-to-paste agent brief:
# Clone any site via the Clonesite API
base       https://clonesite.ai/api/v1
mcp        https://clonesite.ai/mcp
auth       Authorization: Bearer cs_live_...
spec       https://clonesite.ai/openapi.json
discovery  https://clonesite.ai/llms.txt
server     https://clonesite.ai/mcp/server-card
For API-key access, a human account owner creates the key first — then an agent uses it. OAuth-capable agents can instead discover the authorization server from Clonesite metadata and obtain scoped Clone API access tokens. In both cases, do not hand an agent session cookies, magic-link URLs, raw payment credentials, or dashboard-only secrets.
Polling works with just the API key. If your integration passes callbackUrl, also open the webhook
panel on /developers, rotate the signing secret, and store the revealed whsec_... value in your
server. The secret belongs to the account; the callback URL still belongs to each request, so
different jobs can post to different endpoints while your verifier uses the same account secret.
Step 2 — Authenticate every call
Every request carries a bearer credential in the Authorization header. This guide uses a
human-created API key, while OAuth-capable clients can use scoped access tokens discovered from
Clonesite auth metadata:
curl https://clonesite.ai/api/v1/clone-requests/api_req_example \
  -H "Authorization: Bearer cs_live_a1b2c3d4..."
Each credential is scoped to explicit permissions: clone_requests:create, clone_requests:read,
and source_downloads:create. Preflight and test-runs use the create permission, status polling
uses read, and source ZIP downloads use the source-download permission.
Step 3 — Preflight and run a free test
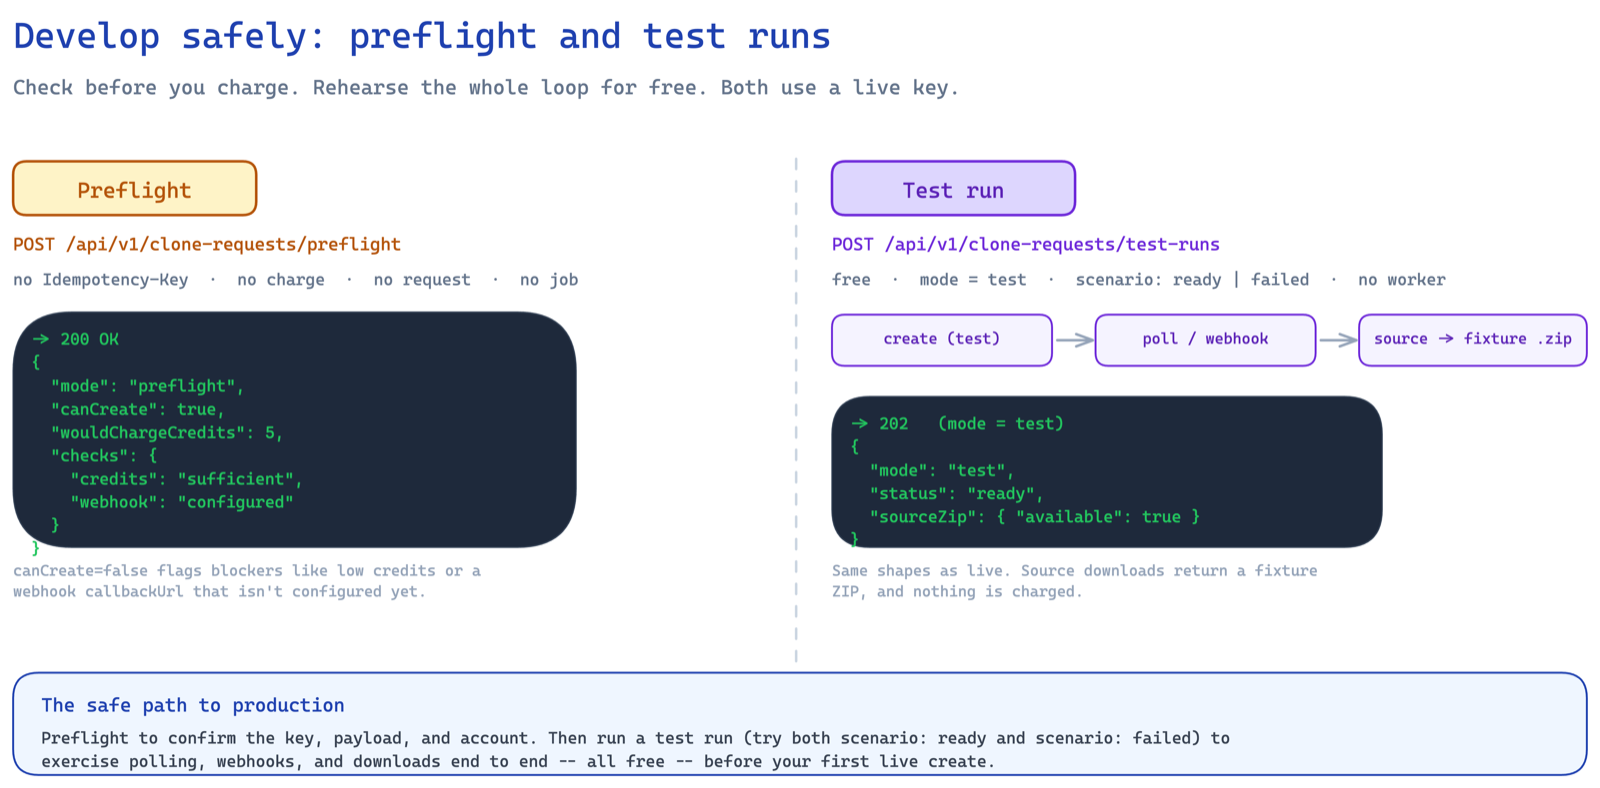
Preflight checks before you charge. Test runs exercise polling, webhooks, and downloads for free.
Before spending credits, validate the same payload with preflight. It checks the key, permission,
payload, credits, and, when callbackUrl is present, webhook configuration. Without callbackUrl,
the same API key can create and poll a request without any webhook secret. Preflight does not
write a request, create a job, charge credits, or send a webhook.
curl -X POST https://clonesite.ai/api/v1/clone-requests/preflight \
  -H "Authorization: Bearer cs_live_a1b2c3d4..." \
  -H "Content-Type: application/json" \
  -d '{
    "sourceUrl": "https://stripe.com",
    "prompt": "Clone this site as an editable React and Tailwind app.",
    "externalRequestId": "order_123",
    "callbackUrl": "https://your-app.com/webhooks/clonesite"
  }'
A passing preflight confirms the call will work — without creating anything or moving credits:
{
  "ok": true,
  "mode": "preflight",
  "canCreate": true,
  "wouldChargeCredits": 5,
  "wouldCreateCloneRequest": false,
  "wouldCreateJob": false,
  "checks": {
    "apiKey": "valid",
    "permission": "clone_requests:create",
    "payload": "valid",
    "credits": "sufficient",
    "webhook": "configured"
  }
}
During setup, run test-runs with the same live key and webhook handler. It creates a free
mode: "test" request and sends signed clone.ready or clone.failed webhooks. The response is
the same request object a live call returns — not a download URL — so you exercise polling,
webhooks, and even a free fixture source download through the exact same endpoints, without paying
for a real clone.
curl -X POST https://clonesite.ai/api/v1/clone-requests/test-runs \
  -H "Authorization: Bearer cs_live_a1b2c3d4..." \
  -H "Idempotency-Key: test_order_123" \
  -H "Content-Type: application/json" \
  -d '{
    "sourceUrl": "https://stripe.com",
    "prompt": "Test my Clone API integration.",
    "externalRequestId": "test_order_123",
    "callbackUrl": "https://your-app.com/webhooks/clonesite",
    "scenario": "ready"
  }'
The test run returns mode: "test". Poll it or wait for the webhook exactly like a live request — it
reaches ready (or failed, per scenario) without spending a credit:
{
  "id": "api_req_def456",
  "mode": "test",
  "status": "queued",
  "sourceZip": { "available": false, "unlocked": false, "creditCost": 0 },
  "statusUrl": "/api/v1/clone-requests/api_req_def456"
}
Step 4 — Create a live clone request
Send the public URL you want to clone and a prompt describing the output. The Idempotency-Key
header is required on live create and test-runs — it's what makes retries safe.
curl -X POST https://clonesite.ai/api/v1/clone-requests \
  -H "Authorization: Bearer cs_live_a1b2c3d4..." \
  -H "Idempotency-Key: order_123" \
  -H "Content-Type: application/json" \
  -d '{
    "sourceUrl": "https://stripe.com",
    "prompt": "Clone this site as an editable React and Tailwind app.",
    "externalRequestId": "order_123",
    "callbackUrl": "https://your-app.com/webhooks/clonesite"
  }'
externalRequestId and callbackUrl are optional. You get back 202 Accepted and a stable
api_req_* id:
{
  "id": "api_req_abc123",
  "mode": "live",
  "status": "queued",
  "sourceUrl": "https://stripe.com/",
  "credits": { "charged": true, "creditCost": 5, "refunded": false },
  "sourceZip": { "available": false, "unlocked": false, "creditCost": 100 },
  "statusUrl": "/api/v1/clone-requests/api_req_abc123"
}
Creating a live request costs 5 credits, charged immediately. Preview is free; downloading source is a separate, later action (Step 6).
Idempotency, the right way
The Idempotency-Key is your safety net for flaky networks:
- Same key + same body → you get the same request back. Retry as often as you like; you're never double-charged and never get a duplicate job.
- Same key + different body →
409 idempotency_conflict. The key is bound to the first payload it saw (including thecallbackUrl).
Use something stable and meaningful, like order:${orderId} or a UUID you persist next to the work.
Step 5 — Wait for ready (poll or webhook)
A clone runs asynchronously and usually takes about 1–3 hours. There are two ways to learn when it's done.
Poll the status endpoint:
curl https://clonesite.ai/api/v1/clone-requests/api_req_abc123 \
  -H "Authorization: Bearer cs_live_a1b2c3d4..."
The status moves through a small, predictable lifecycle, and the credit accounting is built in:
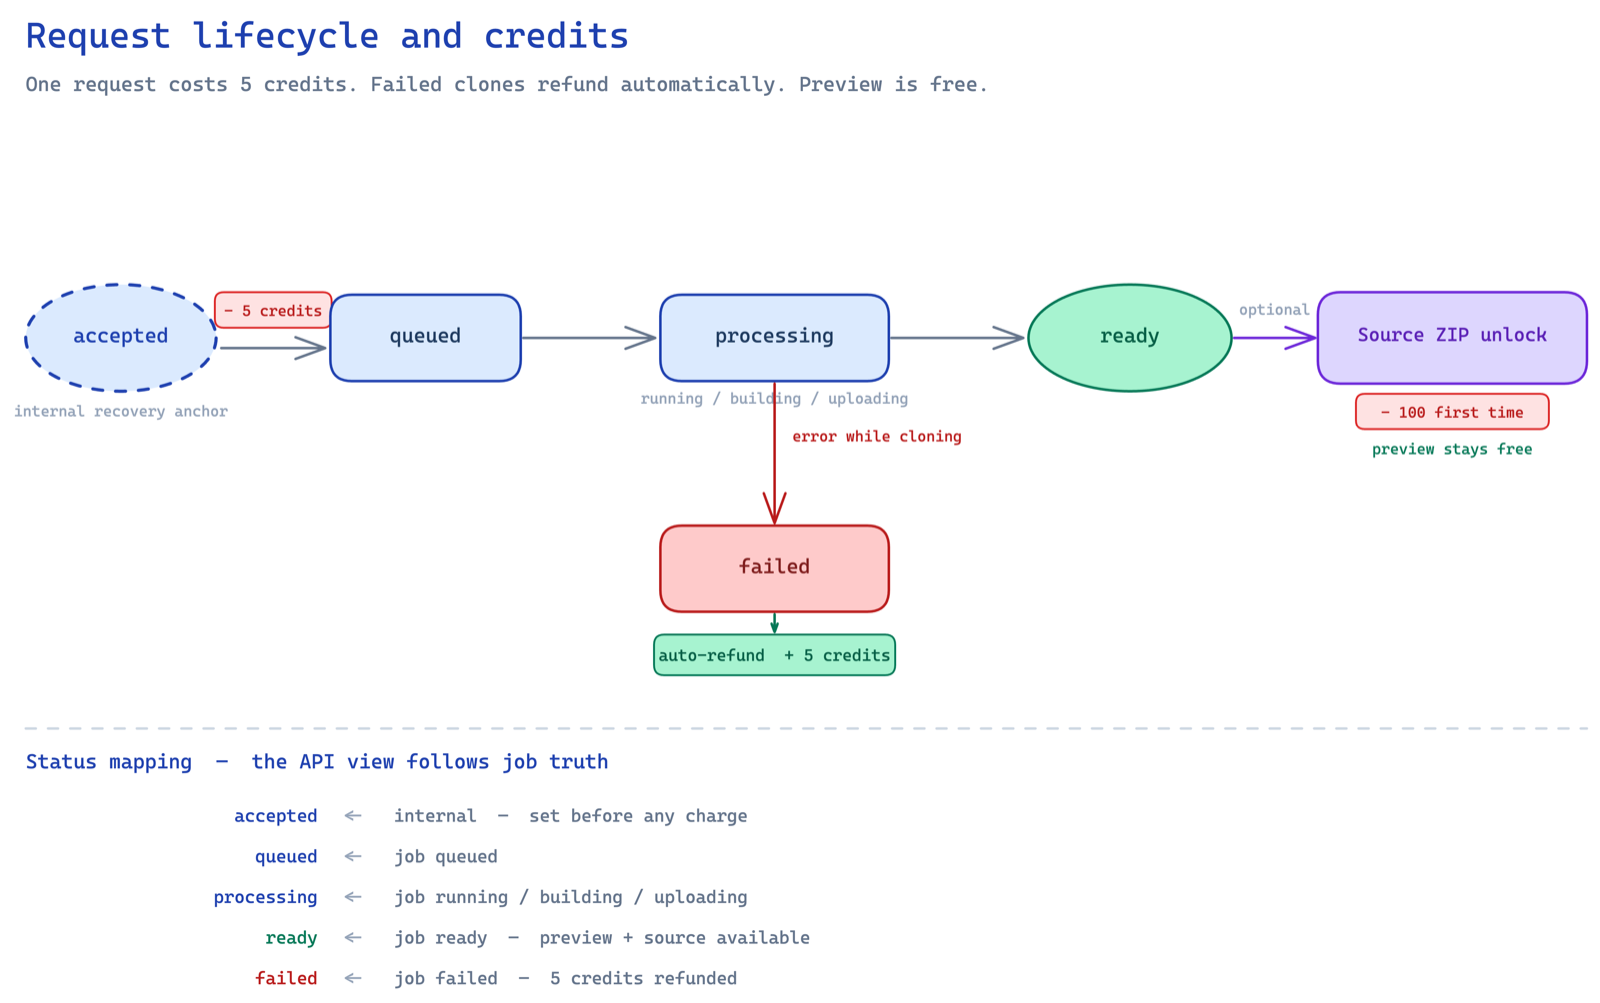
Five credits on create. Failed clones refund automatically. Preview stays free.
A ready response exposes the preview and whether source is available — but never a download URL:
{
  "id": "api_req_abc123",
  "mode": "live",
  "status": "ready",
  "previewUrl": "https://preview.clonesite.ai/...",
  "sourceZip": { "available": true, "unlocked": false, "creditCost": 100 }
}
If the clone fails, the status becomes failed and the 5 credits are refunded automatically —
you don't pay for builds that don't land.
Or receive a webhook. Polling remains available either way. If you passed a callbackUrl,
Clonesite POSTs a signed event the moment the request reaches a terminal state:
event: clone.ready | clone.failed
{
  "event": "clone.ready",
  "id": "evt_abc123",
  "mode": "live",
  "cloneRequestId": "api_req_abc123",
  "artifactSlug": "stripe-a1b2c3",
  "previewUrl": "https://preview.clonesite.ai/...",
  "sourceZip": { "available": true, "unlocked": false, "creditCost": 100 }
}
Verify the signature before trusting the body. Use the whsec_... secret revealed on
/developers. Each delivery follows Standard Webhooks headers and signs
webhook-id + "." + webhook-timestamp + "." + rawBody:
webhook-id: evt_abc123
webhook-timestamp: 1781946000
webhook-signature: v1,<base64 hmac_sha256>
import crypto from "node:crypto";

function verifyClonesiteWebhook(rawBody, headers, secret) {
  const id = headers["webhook-id"];
  const ts = headers["webhook-timestamp"];
  const signature = headers["webhook-signature"]; // "v1,<base64>"
  const expected = crypto
    .createHmac("sha256", secret)
    .update(`${id}.${ts}.${rawBody}`)
    .digest("base64");
  const provided = signature?.startsWith("v1,") ? signature.slice(3) : "";
  return (
    provided.length === expected.length &&
    crypto.timingSafeEqual(Buffer.from(provided), Buffer.from(expected))
  );
}
Webhooks are a notification, not the source of truth. Deliveries retry with backoff, and the body never carries the download URL — so even a leaked webhook log can't be used to pull your source. After receiving one, call the status endpoint to confirm.
Step 6 — Download the source (optional)
The source ZIP is a deliberate second step, taken after a human (or your agent) is happy with the preview. Unlocking it the first time costs 100 credits:
curl -X POST https://clonesite.ai/api/v1/clone-requests/api_req_abc123/source-downloads \
  -H "Authorization: Bearer cs_live_a1b2c3d4..."
{
  "downloadUrl": "https://r2.clonesite.ai/signed-url",
  "expiresAt": 1781949600000,
  "filename": "stripe-a1b2c3-source.zip",
  "creditCost": 100,
  "alreadyUnlocked": false,
  "artifact": {
    "artifactId": "src_art_abc123",
    "artifactSlug": "stripe-a1b2c3",
    "filename": "stripe-a1b2c3-source.zip",
    "contentType": "application/zip",
    "status": "ready",
    "checksumSha256": "9f86d081884c7d65...",
    "sizeBytes": 5242880,
    "createdAt": 1781949000000,
    "updatedAt": 1781949600000
  }
}
The URL is short-lived (about 5 minutes) — download or copy the ZIP to your own storage before expiresAt. Calling
the endpoint again only re-signs a fresh URL; it does not charge another 100 credits once the
request is unlocked.
Errors worth handling
The API returns a stable JSON error shape, so your agent can branch on error.code instead of
parsing prose:
{ "error": { "code": "insufficient_credits", "message": "..." } }
400—invalid_request,missing_idempotency_key, orinvalid_json: a bad body, a missingIdempotency-Keyheader, or unparseable JSON.401—missing_api_keyorinvalid_api_key: no key, or a wrong or revoked key.402—insufficient_credits: not enough credits to create or unlock.403—insufficient_permissionsorapi_key_account_not_found: the key lacks the required permission, or its account is unavailable.404—not_found: unknown request — also returned for a request that belongs to another account.409—idempotency_conflict,request_not_ready, orsource_artifact_not_ready: a reused key with a new body, or source requested before the clone (or its artifact) is ready.422—invalid_callback_urlorwebhook_not_configured: a malformed callbackUrl, or one passed before the account has an active webhook signing secret.429—rate_limitedorusage_exceeded: slow down and honor theRetry-Afterheader.500—internal_error: an unexpected server error; retry with the sameIdempotency-Key.
That's every code the API emits — openapi.json carries the same enumeration, so an agent can map each one without reading this page.
A revoked key starts returning 401 immediately, so rotating credentials is instant.
Built for agents: discovery
Here's the part that makes this an agent API rather than just a REST API: an agent doesn't need a human to read these docs. Hand it a bearer credential and the discovery links, and it discovers the rest itself.
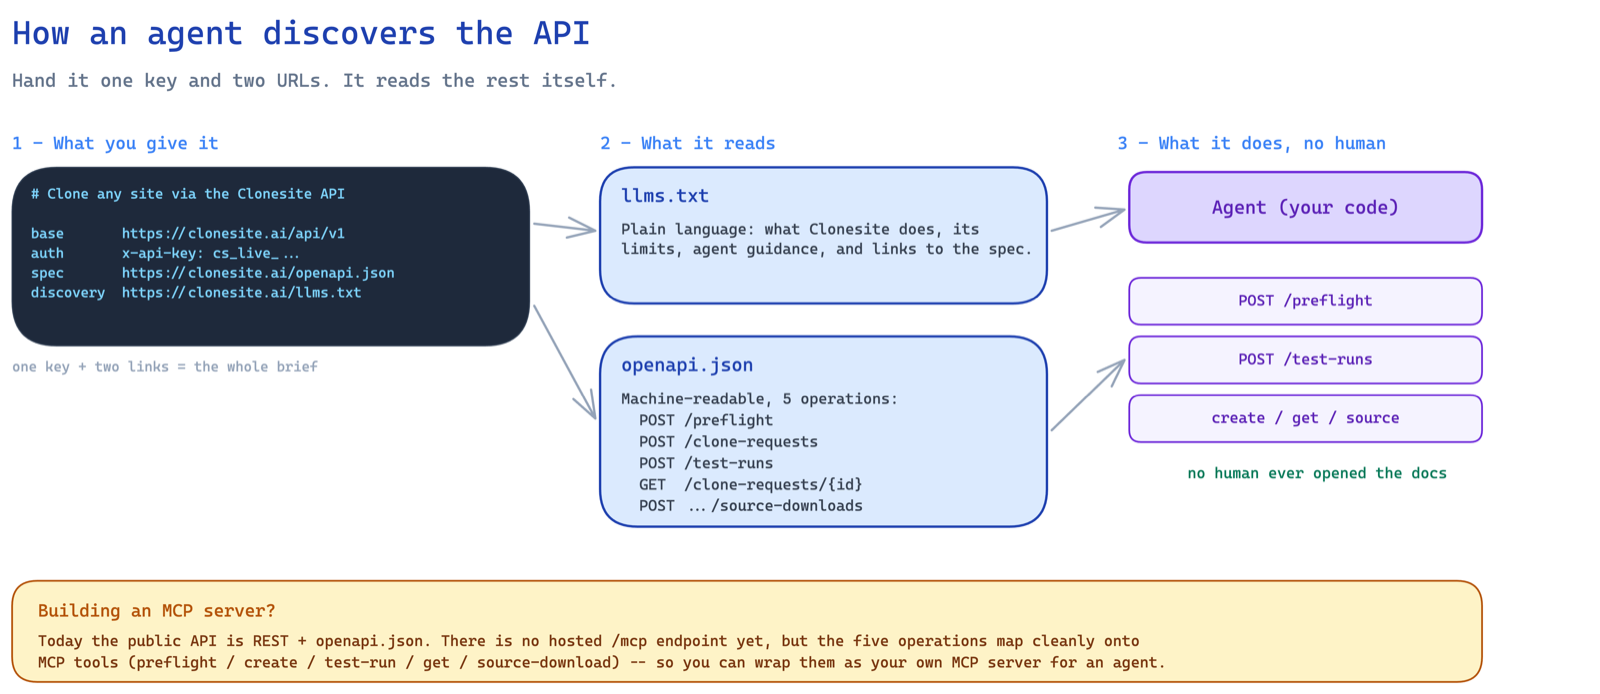
Hand it one credential and discovery links; it chooses REST or MCP and constructs the calls.
- llms.txt describes, in plain language, what Clonesite does, its limits, and how an agent should use it.
- openapi.json is the machine-readable contract: preflight,
free test-runs, live create, status polling, source downloads, the
Authorization: Bearerscheme, and every error code. - MCP server card and
MCP catalog advertise the hosted
Streamable HTTP MCP endpoint at
https://clonesite.ai/mcp.
Using MCP? Clonesite now hosts
/mcpas a Streamable HTTP MCP server. It exposes the same five operations as tools: preflight, test-run, create, get, and source-download. UseAuthorization: Bearer <api-key-or-oauth-access-token>; AgentAuth JWTs are for capability execution and should not be sent directly to/mcp.
Putting it together
Here's the whole live loop in one place — preflight, create, poll, download — with native fetch
and no dependencies:
const BASE = "https://clonesite.ai/api/v1";
const KEY = process.env.CLONESITE_API_KEY;

async function cloneSite(sourceUrl, prompt, idempotencyKey) {
  // 1. Preflight (no side effects)
  const preflight = await api("/clone-requests/preflight", {
    method: "POST",
    headers: { "Content-Type": "application/json" },
    body: JSON.stringify({ sourceUrl, prompt }),
  });
  if (!preflight.canCreate)
    throw new Error(`preflight blocked: ${JSON.stringify(preflight.checks)}`);

  // 2. Create live request (spends 5 credits)
  let req = await api("/clone-requests", {
    method: "POST",
    headers: { "Idempotency-Key": idempotencyKey, "Content-Type": "application/json" },
    body: JSON.stringify({ sourceUrl, prompt }),
  });

  // 3. Poll until terminal
  while (req.status !== "ready" && req.status !== "failed") {
    await new Promise((r) => setTimeout(r, 5000));
    req = await api(`/clone-requests/${req.id}`);
  }
  if (req.status === "failed") throw new Error("clone failed (credits refunded)");

  // 4. Download source (spends 100 credits on first unlock)
  const dl = await api(`/clone-requests/${req.id}/source-downloads`, { method: "POST" });
  return dl.downloadUrl;
}

async function api(path, init = {}) {
  const res = await fetch(`${BASE}${path}`, {
    ...init,
    headers: { Authorization: `Bearer ${KEY}`, ...(init.headers ?? {}) },
  });
  const body = await res.json();
  if (!res.ok) throw new Error(`${res.status} ${body.error?.code}`);
  return body;
}
That function is the entire REST integration. Give your agent a bearer credential, point it at this loop or the hosted MCP server card, and it can clone any public site into editable source on its own.
Create your key on /developers, or use OAuth-capable agent login. Add the webhook secret only if your integration wants callbacks; otherwise your agent can poll with the bearer credential alone.
Prefer the hosted UI instead? The step-by-step cloning guide covers the same flow without writing code, and the pricing page lists the credit packs both paths draw from.
FAQ
What is a website clone API?+
A website clone API takes a public URL and returns editable source code for the page, programmatically over REST or MCP. Instead of cloning pages by hand in a UI, an agent or script creates a request, polls for completion, and downloads the result.
How do I authenticate to the Clonesite Clone API?+
Every request carries a Bearer token. The token is either a human-created API key or an OAuth access token with Clone API scopes. No other auth setup is required.
Can an AI agent use the Clone API on its own?+
Yes. The API is built for agents: discovery via llms.txt and openapi.json, a free mock integration test, idempotent create calls, and optional webhooks mean an agent can run the full flow after a human authorizes the credential.
Does the Clone API offer a free test?+
Yes. The preflight step runs a free mock integration test that validates the request shape and credentials without spending credits or starting a real clone.
What format is the downloaded source?+
The source is React and Tailwind, exported as a zip. It is editable source, not a screenshot or a locked bundle.
Related guides
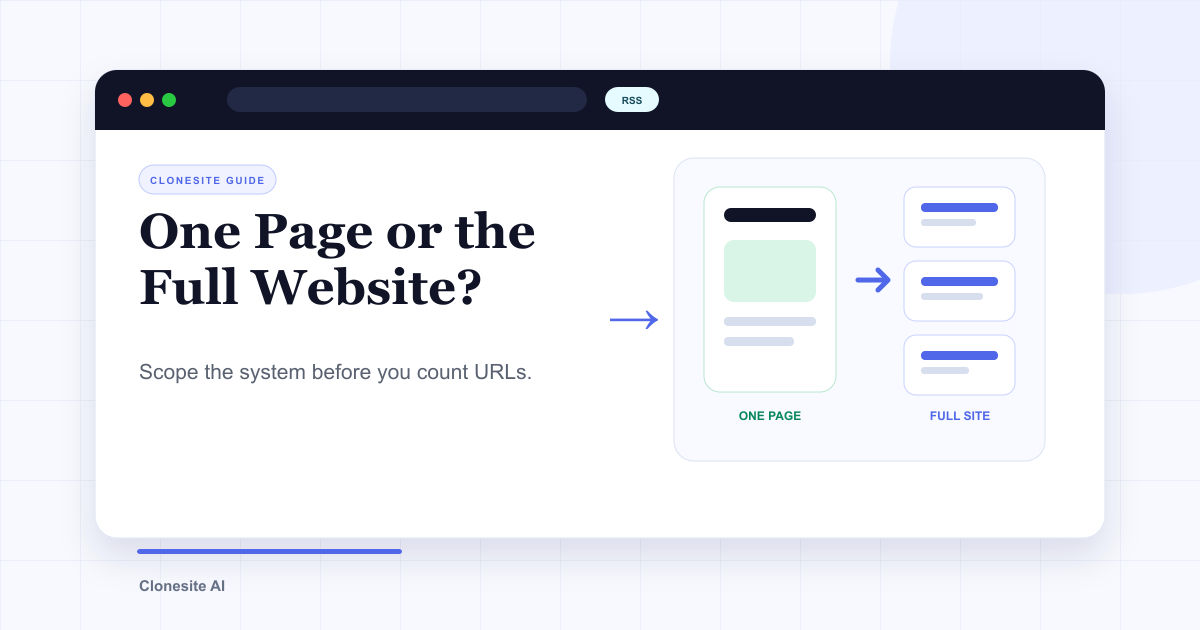 Clone One Web Page or the Full Website? Scope, Cost, and Launch ChecklistClone one page when the value is concentrated in a landing page or prototype. Rebuild the full website when navigation, repeated page types, SEO URLs, forms, and a coordinated launch are part of the outcome.
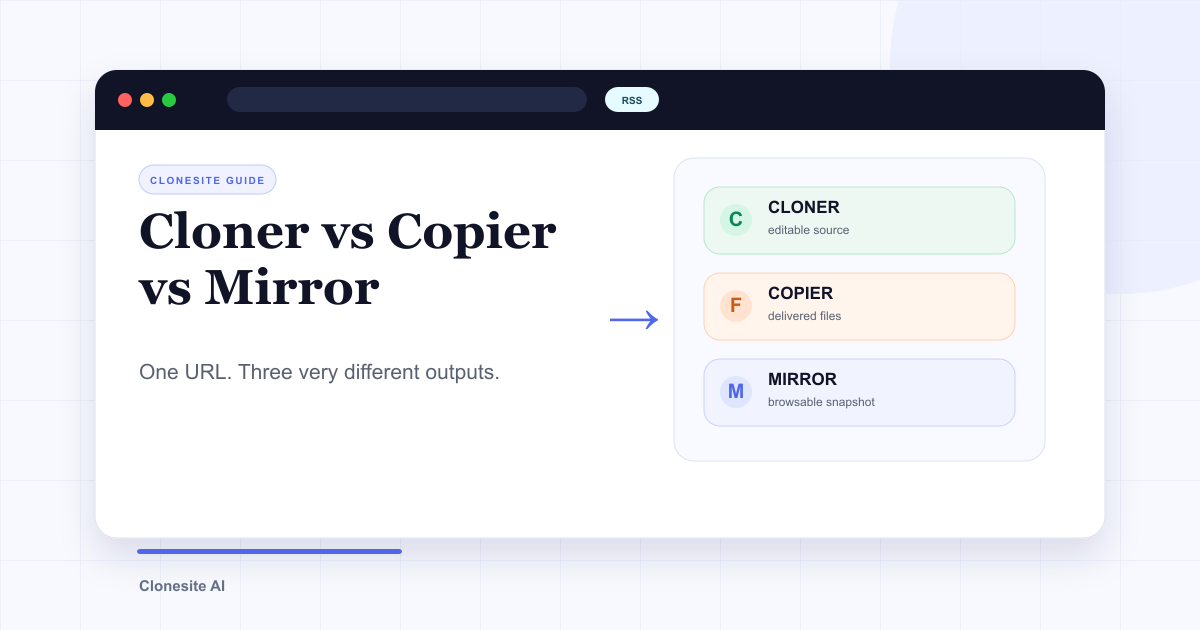 Website Cloner vs Website Copier vs Website Mirror: What Each One Actually SavesA website cloner rebuilds a public page as editable source, a copier downloads files the server sends, and a mirror preserves a browsable snapshot. Choose by what you need to edit, preserve, or publish afterward.
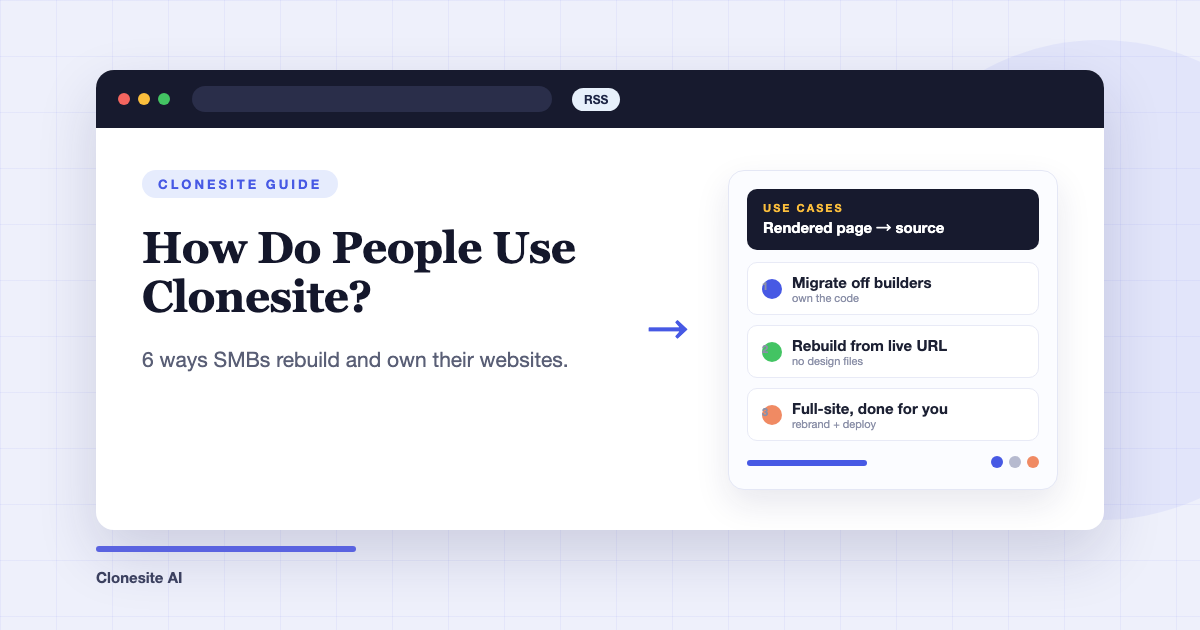 How Do People Use Clonesite? 6 Ways SMBs Rebuild and Own Their WebsitesPeople use Clonesite to turn any live web page into editable React and Tailwind source. The most common uses are migrating off site builders like Webflow and Framer, rebuilding an outdated site from its live URL, launching from a proven layout, and full-site done-for-you rebuilds.